Creating a new Customisation Specification
As part of my job I tend to deploy a lot of images from templates and I always use a customisation specification to make it easier. Why? Because it can automatically configure network settings (such as IP address, gateway and DNS), it will generate a new SID and join the computer to the domain. Today I need to create a new specification for servers on a different subnet and domain. Here are the steps to do this in the vSphere client…
1. On the Home tab select Customization Specification Manager
2. Click New
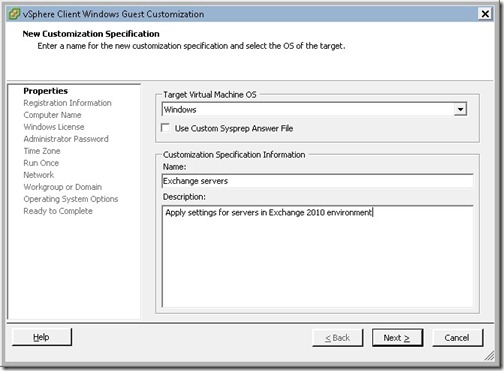
3. Choose the target OS, enter a Name and Description then click Next. I’ve entered a useful description to make sure I know what the template will do when I need to apply it later.
4. Enter the registration information and click Next
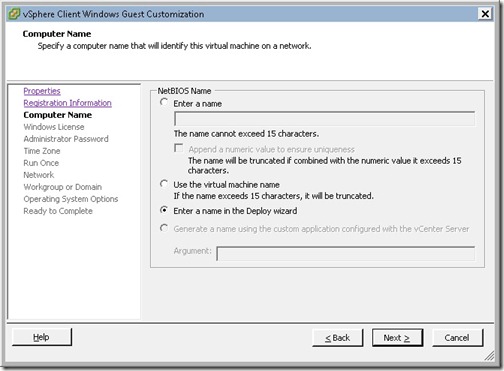
5. For the computer name I will choose to enter a name during the Deploy Wizard. Click Next
6. Enter the Windows product key and click Next. I am leaving mine blank as I have a KMS server running on the network.
7. Enter a password to use for the local administrator account and click Next
8. Choose the time zone and click Next
9. If required, enter commands to run at Windows startup. Otherwise leave this blank. Click Next
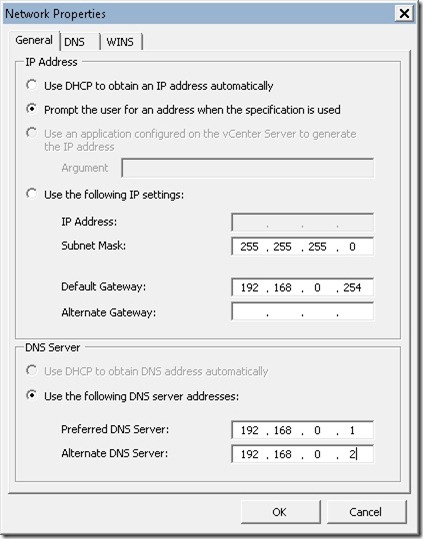
10. I have selected the Custom settings for Network so that I can configure the NIC settings to include DNS and WINS servers and a default gateway. I’ll also choose to be prompted for an IP address during the Deploy Wizard. Click Next
11. Either choose to join the computer to a domain or workgroup and click Next
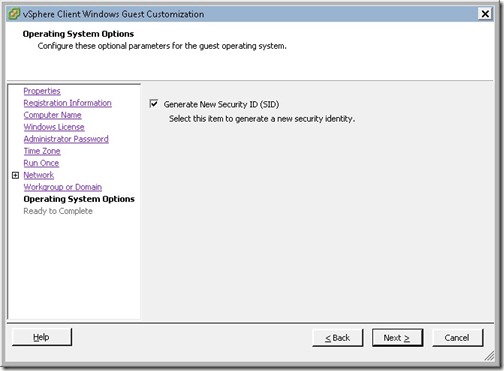
12. Make sure the box is ticked to generate a new SID, otherwise this will cause all sorts of issues down the line. Click Next
13. Click Finish
Now, when deploying images using a template, I can choose the new customization specification from the list and all of these options will be configured for me.


![[BlogBookmark]](http://www.adventuresinvmware.co.uk/wp-content/plugins/bookmarkify/blogbookmark.png)
![[Blogsvine]](http://www.adventuresinvmware.co.uk/wp-content/plugins/bookmarkify/blogsvine.png)
![[del.icio.us]](http://www.adventuresinvmware.co.uk/wp-content/plugins/bookmarkify/delicious.png)
![[Digg]](http://www.adventuresinvmware.co.uk/wp-content/plugins/bookmarkify/digg.png)
![[Facebook]](http://www.adventuresinvmware.co.uk/wp-content/plugins/bookmarkify/facebook.png)
![[Furl]](http://www.adventuresinvmware.co.uk/wp-content/plugins/bookmarkify/furl.png)
![[Google]](http://www.adventuresinvmware.co.uk/wp-content/plugins/bookmarkify/google.png)
![[LinkedIn]](http://www.adventuresinvmware.co.uk/wp-content/plugins/bookmarkify/linkedin.png)
![[MySpace]](http://www.adventuresinvmware.co.uk/wp-content/plugins/bookmarkify/myspace.png)
![[Reddit]](http://www.adventuresinvmware.co.uk/wp-content/plugins/bookmarkify/reddit.png)
![[Slashdot]](http://www.adventuresinvmware.co.uk/wp-content/plugins/bookmarkify/slashdot.png)
![[StumbleUpon]](http://www.adventuresinvmware.co.uk/wp-content/plugins/bookmarkify/stumbleupon.png)
![[Twitter]](http://www.adventuresinvmware.co.uk/wp-content/plugins/bookmarkify/twitter.png)
![[Windows Live]](http://www.adventuresinvmware.co.uk/wp-content/plugins/bookmarkify/windowslive.png)
![[Yahoo!]](http://www.adventuresinvmware.co.uk/wp-content/plugins/bookmarkify/yahoo.png)
![[Email]](http://www.adventuresinvmware.co.uk/wp-content/plugins/bookmarkify/email.png)